Saturday, October 3, 2015

How to Distress a New Industrial Chair

Hell00000000....is anyone here anymore! Don't choke on a chip, it's been awhile. I've been busy on my Freckle Face Girl Facebook account, but not so much here. Do you follow me there yet?

I'll just hop right back into it like I was never gone. M'kay?

I have been coveting the industrial chairs seen around blogland and Restoration Hardware and Pottery Barn and "Fixer Upper".

I've been wanting a black distressed finish, but it seems distressing costs more. A little strange, right?


Fixer Upper

Restoration Hardware

You can find them at World Market, Target and a few other places. But be sure to read the reviews. The chairs at Target seemed great, but apparently people thought they were mini sized. And then I came across these beauties, at Walmart of all places! The reviews were great, and if all else failed, I could return them right down the street. They come in a 2-pack for $125 (but I just bought them for $119, so apparently the price fluctuates). Not too bad, right? They came quickly, packaged nicely with no damage. But....


man ,they were SUPER shiny. Like, really, crazy, shiny! And you know as soon as someone sat down with metal buttons on their pockets, it was going to leave a weird scratch that would be all like "LOOK AT ME!!!". I scoured Pinterest for DIY's on how to age them ,but the only one I found mentioned muriatic acid (which I'd still like to try for rust). So....what's a girl to do?

Get our your sanding blocks of course! I used 2 - a very course grit to knot the laquer completely off, exposing the metal underneath. I sanded all of the places it naturally would wear, along the edges, legs, back and on the seat. 


Because the course grit scratches the surface, you have to use the finest grit block to feather out the edges of the distressed spots. 


I also used the finest grit to knock down the paint ad shine, not exposing the metal finish, but the primer underneath, which was a really pretty matte gunmetal color. In other places where the chair was still too shiny, I gently did a pass with the fine grit block.


If you use a bottle of hydrogen peroxide a tablespoon of muriatic acid and spray it on, letting it sit for about 1/2 hour, you can instantly create rust in the exposed metal surfaces. A paste wax could be applied to seal the surface so you don't get rusty spots on your clothes.


They do have a shorter back then the other chairs I have, but I like the look of different chairs at the head of the table. These are comfortable for both the adults and kids in my family, not tippy or unstable. They fit all of our backsides just fine (some of the Target reviews noted that adults couldn't fit in the chairs!) Little rubber feet protect the floor.

What do  you think? Do you prefer the ultra shiny or the matte distressed? 


xo-


Chris 


Friday, April 18, 2014

DIY Faux Wood Floor {TUTURIAL}

Happy happy Friday!! 

I finally have the full tutorial for the paper "wood plank" floors I showed you (and showed you and showed you if you follow me on Facebook). What can I say. It's worth repeating myself over...see...


I was asked by my besties (ok, so,  maybe they wouldn't classify me that way) over at Remodelaholic if I would be their guest and share my tute' over on their blog (because let's face it, they know WAY more people than I do!) and get the word out on how awesome these floors are! And because I want everyone to know, I said ABSOLUTELY! 
 
So come on! Let's go! Head on over and learn how to create your own Faux Wood Paper Floor. Be sure to ask lot's of questions and then come back and follow me on Facebook or better yet, sign up (right over there)
to have emails sent directly to you every time I do something crazy!

xo-Chris

Sunday, March 23, 2014

Reclaimed Wood Floor {Paper Flooring}

I've done something crazy. And believe me, I've heard about how crazy it was. I've gotten some strange looks. Some "that will never work" comments. Some snickers and chuckles and rolling eyes. One "why don't you just do the real thing". 

I ripped out my perfectly fine carpet.


I cut and painted. I glued and glued. I stained and poly'd.
 

And I created this.
 

Yes. It's a paper floor. Can you believe such a thing?

Either can I.

 I love it. I LOVE IT. 

It's not perfect. Neither am I.

Sometimes you have to follow your own path, even when it's the path no one else travels.

party Skip To My Lou The Dedicated House
My Uncommon Slice of Suburbia

Wednesday, November 20, 2013

Chinese Noodle Soup {Recipe} and Sneak Peak

I know I'm  not a food blogger.  But cooking is just about the only thing I have been getting done lately. Everyone has to be fed, right? I figured I would share our family favorite recipes in the meantime because everyone probably still has to eat at your house too.


This has been one of our favorite recipes for a couple of years. My boys l. o. v. e.  chinese pork. They would eat it every day if I let them. This recipe combines chinese pork with some other really yummy foods like bok choy and noodles and ginger. It's really simple, filling and may just become a favorite at your house too. Let's get to it...

Chinese Noodle Soup 
Adapted from Weight Watchers New Complete Cookbook

Feeds 6 but I almost always double because my kids want 2nds...and maybe so do I.
INGREDIENTS
1 (48-ounce) carton reduced sodium chicken broth
2 scallions, sliced on the diagonal
1 (1-inch) piece fresh ginger, peeled and minced
1 Tbsp. reduced-sodium soy sauce
6 baby bok choy, halved
1 cup matchstick-cut carrots
2 cups cooked whole wheat capellini
6 ounces, lean-cooked pork, cut into matchsticks
1 cup lightly packed baby spinach
Sliced snow peas (optional)
- See more at: http://www.nothankstocake.com/2012/04/05/new-recipe-chinese-noodle-soup/#sthash.z0hV2AHG.dpuf
 1 48 oz carton chicken broth
2 scallions, cut on the diagonal
1 one-inch piece of fresh ginger, peeled/minced
1 tablespoon reduced sodium soy sauce
 6 baby bok choy, halved
3 carrots, cut into matchsticks
6 ounces Chinese pork, cut into matchsticks
2 cups pasta
1 cup baby spinach

Combine chicken broth, scallions, ginger and soy sauce in pot and simmer until scallions are tender. 

As you can see below, there are no scallions in my dish, because I didn't have any. I added mushrooms later instead.This recipe is open to changes and is still great, so if you don't have something, just substitute and carry on.


Add bok choy, carrots, and pork and simmer until vegetables are tender. I add the pork in this step because I have 2 little ones that have a hard time with tougher meat, adding it in this step allows it to become tender. I added my mushrooms here as well.

If you don't want it extra tender, add it in the next step.

 
After a few minutes cooking the vegetables, I tucked my pasta "nests" into my pot. I've used Chinese noodles, ramen noodles, spaghetti...anything I had on hand. My kids have been loving these little noodle nests lately, so I used those. 

I decided I needed extra bok choy here too. 


Simmer until your noodles are al dente.
Throw your spinach in until wilted. If you prefer a little kick, you could add some crushed red pepper flakes. Otherwise, you are FINISHED!~


It's so simple, and if you are like me, and have zero patience for steps, I throw everything in the pot at the beginning, and simmer on low until it's finished. About 12 minutes, and we are eating! 

Ok...if you follow me on Facebook you may have seen my sneak peak. And that I've been hinting at something with Chalkboard paint for a while.

Here is a bigger sneak peak until tomorrow...I'm in loovvee.


xo-Chris
 

(48-ounce) carton reduced sodium chicken broth
2 scallions, sliced on the diagonal
1 (1-inch) piece fresh ginger, peeled and minced
1 Tbsp. reduced-sodium soy sauce
6 baby bok choy, halved
1 cup matchstick-cut carrots
2 cups cooked whole wheat capellini
6 ounces, lean-cooked pork, cut into matchsticks
1 cup lightly packed baby spinach
Sliced snow peas (optional)
- See more at: http://www.nothankstocake.com/2012/04/05/new-recipe-chinese-noodle-soup/#sthash.z0hV2AHG.dpuf


Wednesday, November 13, 2013

Coconut Lime Chicken {Recipe}

This isn't a foodie blog - but I like to share a little bit of everything. You can only decorate so many rooms, right?! 

Sometimes you come across a recipe SO. GOOD. You must share. For the greater good of the people. And their tastebuds. So, consider this me, giving  you the answer to all of your chicken dreams, and read on.

Since I'm not a professional foodie blog, I forgot to take step by step pictures yesterday while making this meal. I had 4 kids to feed that were gnawing at my feet waiting to get fed. Priorities people.

But after you taste this chicken, you won't care that I didn't have a gazillion beautifully photographed steps of me sprinkling cumin on chicken. You will just be super thankful that I shared it.

I buy chicken in bulk. Like, 2 40 pound cases every 6 months. This cuts down on random trips to the grocery store and over time saves me a bunch of money. I buy through a company called ZAYCON FOODS (if you click that link, it will bring you to my referral page that will give me $1 if you make an order). They deliver incredible products at great prices across the country. They aren't my sponsors and don't have anything to do with my blog. I am just sharing that with 4 children, and 2 adults, it's a great way to buy fresh bulk, quality meat.

Anyway, when I get my chicken, I immediately bag 40 pounds of it into individual meals to throw in the freezer. Most of them are ready to be baked or put in the crock pot. I also freeze plain chicken with a recipe written on the front of the bag. Really any of these options makes dinner as easy as grabbing take out. No thinking. I'm all about that!

Like this:

 
Put the lime in the coconut and shake it all up...I said Doctor...
 
Ahem. Here is the recipe.
 
 
Coconut Lime Chicken
 
2 large chicken breasts  
Zest and juice from 2 limes
2 teaspoons cumin
3 teaspoons coriander
4 tablespoons soy sauce 
3 teaspoons kosher salt
4 tablespoons sugar
4 teaspoons curry powder
1 cup coconut milk

If your chicken is really thick, pound your chicken down a little bit. Otherwise, just put in a bowl. Mix the remaining ingredients and pour over chicken. 
Marinate 1.5 hours (I marinated mine 3 hours).

To prepare - remove the chicken from the marinade. KEEP THE MARINADE. You are going to boil it for a few minutes on the stove.

Saute the chicken until thoroughly cooked through. While cooking, bring the marinade to a slow, low boil on the stove for at least 3 minutes. I simmered mine for 15 minutes while I cooked the chicken. You need to make sure any raw chicken in the sauce is cooked. 
 
Cut the chicken into thin strips and serve over quinoa, drizzled in the coconut lime curry sauce. Or put into a warmed pita with greens, drizzled with sauce. Or eat straight from the pan.
 
Devour. 
 
Thank me later. 

 xo-Chris

Sunday, November 3, 2013

Junk in my Trunk {Nerf Storage}

I know I'm the worst blogger ever. Really. I do. Who goes missing for a month other than a few Facebook posts here and there. After self analyzing my behavior, I've decided that making a to do list and planning to finish it screws up any creativity I've got at the moment.

Me: 
I should go paint that wall. It would look so cool in {insert color here}.
Oh. Yeah. I promised I'd finish my to do list. Stupid list. I'll go bake brownies instead.

And that is how the last 30 days went. 

Raising 4 kids was pretty time consuming too. 

Anyway...

I'm so sick of writing about the boys room and I'm sure  you're sick of hearing about it too. But, this is one thing I did (while shoving my face full of brownies).

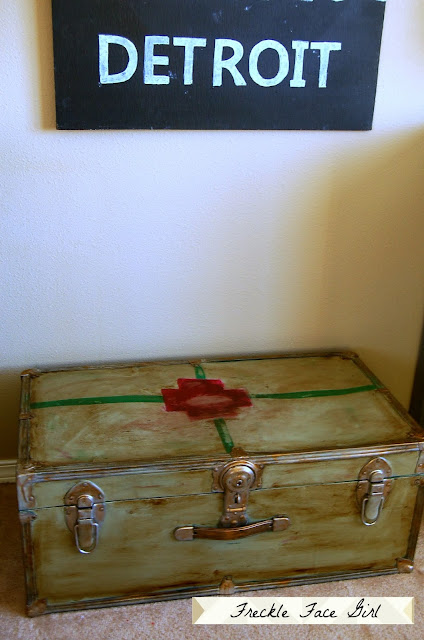
A few years ago I bought this horribly beat up trunk at an estate sale for $5 because my boy really wanted a treasure box. To hide his special things. 

It was dented, and ugly, and shiny. And someone named Tony made sure everyone knew it was his (hers?). Apparently I tried really hard to not take any pictures of it. It's hideous-ness is not captured on film.

I painted it the same color as the dressers a while back. But, still, wasn't really feeling it. Too matchy - matchy. No one needs things to match around here for Pete's sake!

And then the brilliant idea struck at around 4:30 when I should have been making dinner.


Doesn't it look so masculine with it's new coat of green and red cross symbol?


What's inside, you ask? Special treasures found on once in a lifetime adventures?
 

Snakes, and snails, and puppy dogs tails?
 

 Nope.


Friday, September 27, 2013

Starting {Finishing}

This post isn't full of beautiful before and after shots (ok, well, as beautiful as my terrible camera can take). There are no staged and altered and pretty-fied photos. There is no fun DIY project. There is no gluing and sewing and cozy-ing and fluffing. It's real. The stuff you'd see if you walked in my door at this very minute. Instead of saying "where does she find the time to do all of that", you will say "why doesn't she find the time to finish all of that".
 
I've been plugging away at my "to do list". To be honest, I can't actually remember where I put it...but I do remember what I put on it. 

 Painting the upstairs hallway ceiling was on the list (and has been for 5 years...ahem). I have told myself (many times) that Fall would be the best time to do it, so I'm not sweating like a hippo while I do it. Then, every Fall, I quietly move on to fun projects. That don't involve ceilings. Because I hate painting ceilings.


I also told myself and any one else that would listen, that after our last few houses, I would NEVER be painting ceilings. Again. Ever. 

Dang.

If I would have gotten in on the design process when this house was being built, things would have been A LOT different. Like, no flat pink pig tan paint (look it up, that for sure has to be the name of the color) throughout the entire blasted house, including ceilings. Yuck.
 
The good news is, I've started to finish. I've started to finish the master closet that I started way back in February.


I've started to finish the master bath that I started right after I started the master closet (that I didn't finish). 


I've started to finish the ceiling in this room that was finished until I started to change the light...


I've started to finish the last piece of trim in the kiddo's bathroom.


And I've started to start to finish the upstairs hall ceiling that I have put off starting for 5 years (for fear it wouldn't be finished).


 And while I was starting to finish that, I started to really finish other things I started to never finish. 

It's a creative thing.

xo- Chris